 Before that chasm opened up in front of me, my target was to remedy a limp rate of charging. Then the problems rolled in.
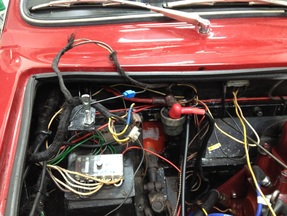
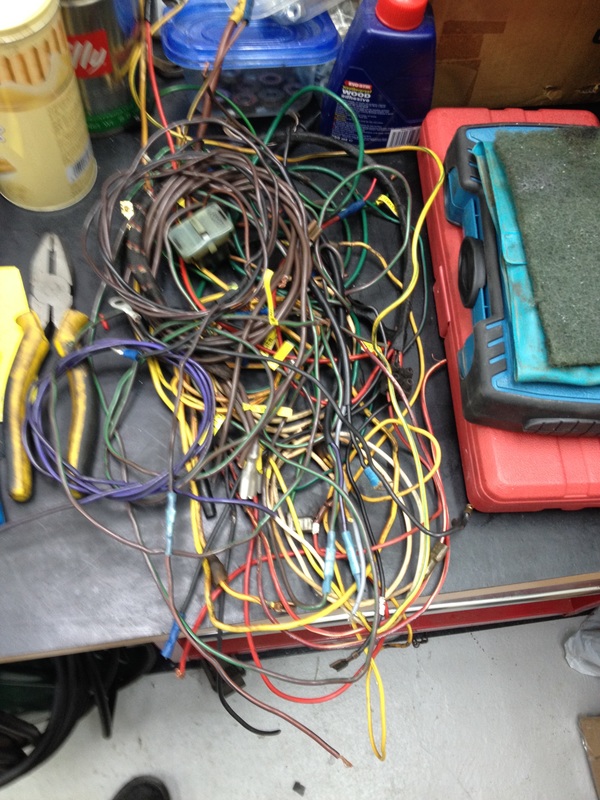
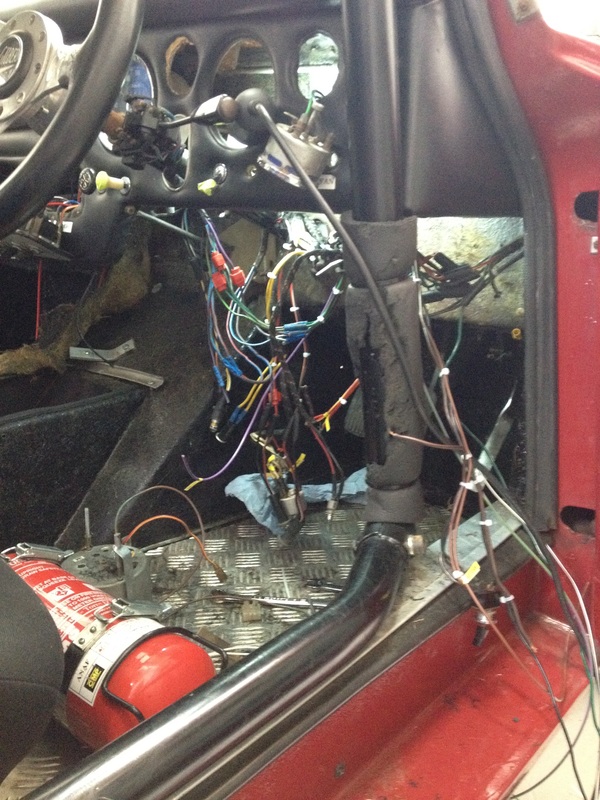
Firstly, the alternator conversion had been executed in the tried and tested fashion: remove the regulator; join the warning light wires; and connect everythig that's left in a big, messy chocolate block connector that guarantees problems for future owners. Click on photo left to see what I mean.
More than any cosmetic challenge, it incorporates two important risks. The first is that you might be trying to jam the alternator's 35/40A down a piece of wire originally rated at about 25A before conductor oxidation and that big insulated butt-shunt in the charge cable ever pushed up its resistance. Then you lace the entire charging circuit through the bulkhead and under the dash through the series-mounted 30A ammeter. Which all sounds to me like it could get pretty toasty.
The next issue thrown up is revertibility. That's not just a question of making it look right or worrying about concours. It is the real problem of homologation standards and race regs that can make dynamos de rigeur. Model T's had alternators using trembler coils, but the good old zener diode did not come along in cars much before 1970. (Pub-quiz entrants might note that this diode is eponymously styled after its inventor - Clarence Zener) So I feel that if I am going to re-engineer this, I am going to make it swing ac/dc, if you see what I mean, so it is dynamo-optional.
So the final formula has become to use a dummy regulator box, providing a physical installation similar to the original that can be swapped for a dynamo regulator if the need arises. Wiring for the charge circuit uses two 3mm cables, making it good for 60A. And a voltmeter in the dash, rather than ammeter.
Of course, this means relocating the dodgy fusebox - which will require rewiring it etc......
After spending another couple of hours painstakingly extracting one wire, and replacing it with another, I have to seek catharsis in writing this blog entry. I am tortured about whether I have gone about this the right way or not, and scope creep is threatening to imprison me.
The story is simple, charging on the car has not been very clever despite the presence of an alternator. I replaced brushes and it was no better, even recognising that the conductor rings are groovier than Austin Powers. But, paying some attention to the wiring, I realised that it still used the original dynamo wires - good for 25A. Then, tracing it back, was able to delve into the darker orifices of the engine comparment and extract great coils of harness wrapped in oil-damped woven covers, joined with a motley selection of choc-blocks, insulated butts and scotchloks. The woven cloth cover rolled off the cables between my hands and revealed half-century old wiring, its insulation withered and cracking after the migration of plasticisers.
I have seen a GRP-bodied car burn and had no choice but to open the harness up and take a further look. I resolved to do just what was necessary in the engine compartment, extracting damaged or previously-repaired wires, replacing them one at a time. But I have just been sucked into what is now a full-scale reharnessing of the frontend.
Below, on the left, is what I have taken out (and replaced) so far. A prize to whoever guesses correctly the number of scotchloks and butts when the pile is complete. Because, as the current underdash shot shows, there seems to be more to do every day....
The precise contents of the motor are a mystery to me although it is has always seemed reasonably meaty. Kaj told me that it had been built by a reputable MG expert in Denmark, and Kaj is an MG guy and he should know. I can see that it has an 18V head, single Weber etc - but beyond that only a note suggesting it has a Piper 285 cam. Oh, and a photograph of a dyno run showing peak power of about 120bhp.
Since the summer I have also had a problem with plug-fouling. The car would tickover like a bag of crisps and, absent a blast, the plugs were carbon-covered. It seemed so rich that I figured the car behind me on the hill might just about have run up there on my fumes. This was at least attenuated when I ditched the exotic NGK plugs featuring electrodes modelled on hypodermic needles, and with a coating of pure red kryptonite that might explain their cost.
But, having spent 15 years working only with injection and management-systems, and forgetting anything I might ever have known about carburation, it was time to get the car onto some rollers with some old skool help. That saw me heading to Ricky G. near Huntly. For those unfamiliar with the geography of Scotland, this translates as 'quite far up there'.
The result left me no better informed about what is in the lump. But a lot happier with its delivery.
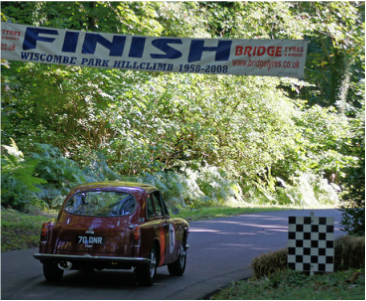 Because of clashing dates, I found myself facing the difficult choice of competing at either the Bo'ness Hillclimb Revival or travelling south to Wiscombe Park to tackle the Gilbern Owners Club's occasionally annual Wiscombe Cup handicap.
Ultimately, the call of the warm, southern sun and the prospect of seeing two other, similar cars was strong. Norman kindly loaned me his transporter for the weekend and I took off with the car and my tent....
I could have wished for an easier journey on Friday, reaching the M5 at 1700. But not managing the paddock until after 2300 following two separate accidents turning the motorway into a parking lot. But it was still too late to plug-in the compressor and inflate my airbed.
It was apparent from Forrestburn that I was not yet home and dry on preliminary suspension settings. Although I was now beginning to rely on the suspension, the front remained underdamped.
So I had a few days to try to sort something out at the front. I had been cautious about using randomly repaired service units, and uncertain about how much damping would be right. So I had previously tracked down Peter Caldwell at World Wide Auto Parts in Wisconsin (!) to talk about his adjustable recreations. Peter uses an externally plumbed needle valve to emulate the old adjustable Armstrong 22 - which suffers from a high unobtanium content.
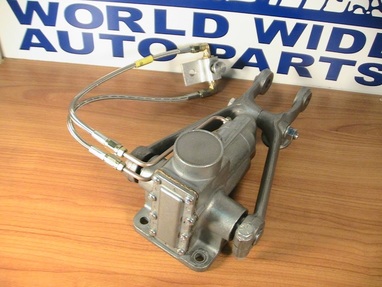 Now the informed observer will tell me that these are likely to breach historic regs on 'external reservoirs', and certainly any Appendix K status. And they'd be right.
But they fix a problem - the front left shocker provided no resistance over half its sweep. And they will allow me to calibrate better the front damping after I have some kind of setup.
However, I recognise that something else will be required in time.
While I was in there, fitting them, I also sliced a few mm off the droop bumpstop (a Midget item I believe) in search of a little more travel.
 Despite it being my 'home' hill, and possibly the most interesting to drive, I had not taken the Gilbern to Forrestburn before. But the need to shake down the car before an anticipated long-trip to Wiscombe a week later saw me enter for both days of August 29/30. The aim was simply an uneventful drive to and from the event, along the M8. And something sub-60 on the hill - after passing scrutineering.
So here we go. 65.80 and 61.44 in practice. With timed runs of 60.98 and 59.06. So, job done. And, after driving home again without incident, decided not to race on Sunday and keep it safe for next weekend's trip. Instead I could get on with the frontend.
The trip had confirmed the need to sort the frontend damping. Fortunately the car now seemed to be avoiding the rear bumpstops in an any too-obvious way. But the front left corner was under-controlled and too much weight being transferred onto the right rear corner.
And thanks to John Crae for his omnipresent photographic coverage - https://jcrae.smugmug.com/
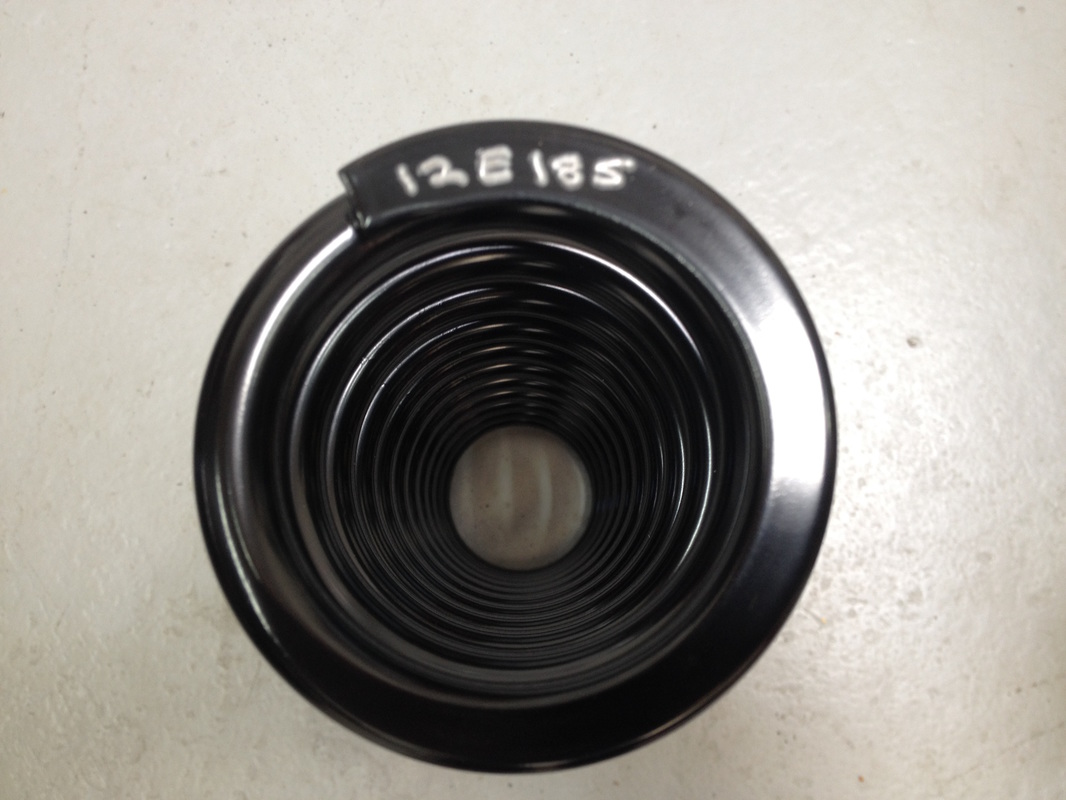
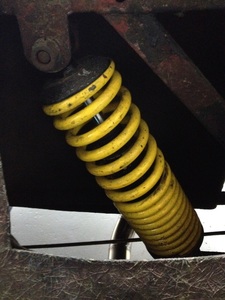 upside-down spring in need of some trig 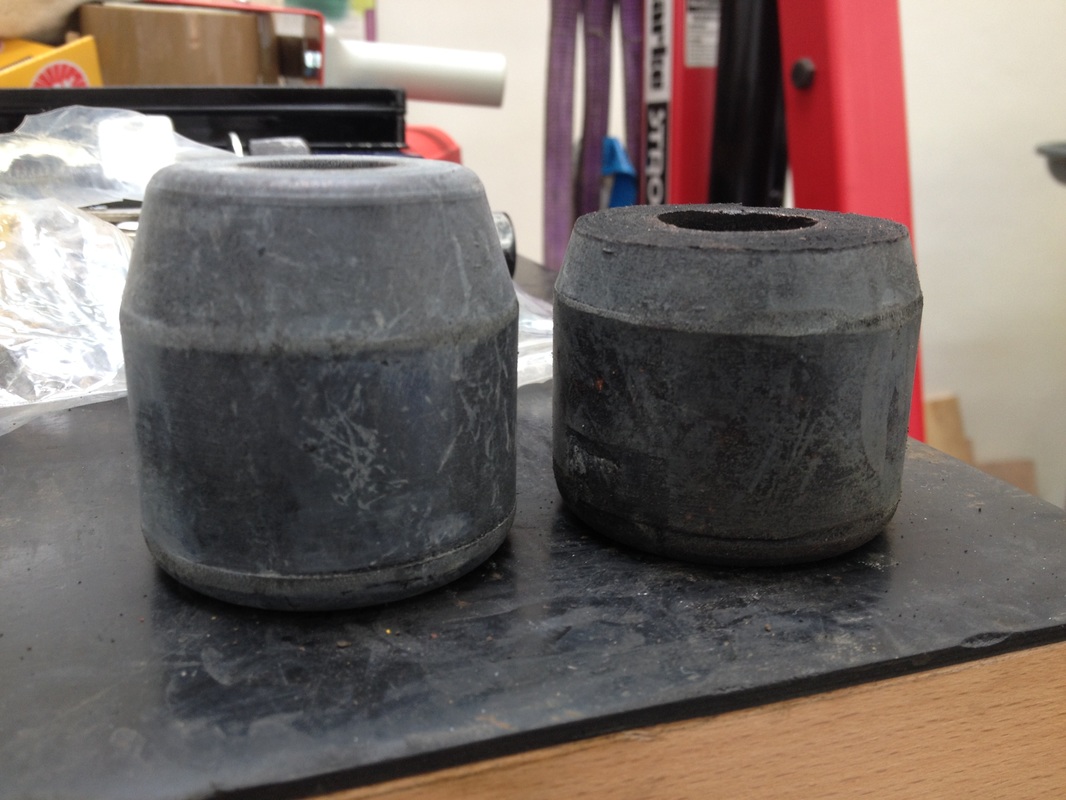 decapitated bump stop  www.dfaulknersprings.com engrave the spring ratings | It was apparent since last year's Bo'ness that the tyre revision had helped tremendously. But it also meant that I had begun to rely more on the suspension - that was telling me the front was underdamped and that I was hitting the back bumpstops, inducing breakaway oversteer. So the first thing I needed to do was get the backend sprung.
I painted neat little datum marks on the body at an arbitrary height on all four corners from whihc to make wheel centres measurements. Then pulled the rear coilovers while wielding a simple tape measure. This showed a total travel of about 8cms in the rear, and just 2.5cms to bump. But it also helped me understand how even this was so-quickly consumed.
The progressive rear coils (which had been installed upside down) were standard 12" length 2.25" diameter. But the felt-tip markings indicating the ratings were practically illegible. A progressive spring is just that, it is one rate that translates at some point during compression to another. So this spring never made it past 'soft' before the car moved onto its bumpstops and the rate became (almost) infinite.
New springs were called for. But I had no understanding of the spec of the existing. Hence back to basics on a simple estimation of what might work. The coilovers have fixed spring pans, so the size was apparent, they would have to be the same as before. But I really just had to take a punt on initial spring weights understanding they were likely to be a sighting shot - and that they may not be only set I ordered.
The coilovers sit a quite a steep angle from the vertical of about 30 degrees. A little trigonometry shows that the spring will operate at an effective 87% (Cos 30) of its rating. The Special Tuning MGB spring (which would share roughly the same attachment pount on the axle) is rated at 124 lbs/inch, a standard one at about 100 lbs/inch. The Gilbern is clearly lighter, but I have race-weight springs at the front, and better damping with these AVO telescopics. So I was happy to throw caution to the wind and try a Faulkner spring of 185 lbs/inch although I did not even have any scale weights for the back - so this was real suck it and see.
Anyway, I put it back together again after reducing a new. standard set of MGB bumpstops by about with a hacksaw. And counted myself a lucky guy to find that the ride height seemed visually correct and a fraction of a cm increased. Overall, total rear travel had grown to almost 10cms, and the car exhibited about 4.5cms to bump.
|
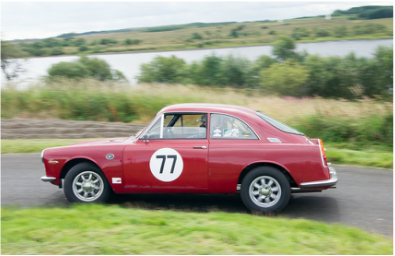
| | Finally got my mugshot on a front page, although hardly through my own celebrity. The Gilbern Owners' Club were good enough to feature a shot of 70DNR from last year's Bo'ness Hillclimb Revival.
The image was the work of David Queenan, an award-winning photographer whose usual stock-in-trade is not as fast-moving as anything in motorsport. But we were fortunate that he lives locally to Bo'ness and just turned out on a nice afternoon in September to take some pictures for fun. Please do take a look at some of his stunning landscape work here....
http://dqphotography.com/
Which brings me around to this year's Bo'ness Hillclimb, which (diaries out, folks) is on the weekend of September 5 and 6. The difficulty for me is that this is also the weekend of the Wiscombe Park meeting in Devon that will see a Gilbern-only competition for an eponymous cup, with the propsect of a Gilbern-only class to boot.
I would hedge my bets and enter both, but that seems fair to neither. So I need to go and talk to the Sorting Hat very soon.
|
Well that's the theory anyway. But the practice did not work out like that in the last couple of weeks.
After giving (too) many months to refurbishing my workshop, I went to start the car for the first time this year and could not get anything more than a big solenoidy 'clunk' out if it. Whatever problems I had were exacerbated by having it parked securely offsite. So no tools, no pit, hee haw.
Checked the motor was not seized (phew). And pulled out the multimeter to do a few rudimentary checks. Conclusion was that the starter motor had died. This was a recentish hi-torque starter motor, so confusing as well as disappointing. My only resort was to pull the dizzie and squeeze into that gap separating the floor from the floorpan to release the bottom mounting bolt. It came off surprisingly easy, and that's where the story really begins.
 That title is supposed to be some kind of Autobot reference. But it was also the question I was busy asking myself on the Wednesday before Bo'ness weekend.
Last year I had a slightly naive exchange with the senior scrutineer, Rob, asking him if I should not have a fireproof bulkhead separating the passenger compartment from the boot? The answer was pretty obvious if I tell you that the little foam-filled petrol tank lives in the boot, and that I'm normally in the seat in the front. Additionally, my car has a rudimentary through-flow ventilation system that attempts to flow air from the passenger compartment into the boot, and then into low-pressure areas ahead of the rear-window through side vents.
And it was all beyond doubt after removing a couple of self-tappers and pulling out the upholstered, plywood parcel shelf. Of course, I had done nothing about it since the previous year and now had three days to fix it and before facing Rob again.
|


 RSS Feed