Well that's the theory anyway. But the practice did not work out like that in the last couple of weeks.
After giving (too) many months to refurbishing my workshop, I went to start the car for the first time this year and could not get anything more than a big solenoidy 'clunk' out if it. Whatever problems I had were exacerbated by having it parked securely offsite. So no tools, no pit, hee haw.
Checked the motor was not seized (phew). And pulled out the multimeter to do a few rudimentary checks. Conclusion was that the starter motor had died. This was a recentish hi-torque starter motor, so confusing as well as disappointing. My only resort was to pull the dizzie and squeeze into that gap separating the floor from the floorpan to release the bottom mounting bolt. It came off surprisingly easy, and that's where the story really begins.
This was the first time I had one of these hi-torque motors in my hand, so had to do a bit of scratching around to understand how they worked. Here's a wee diagram 'borrowed' from the Autozone site (thanks!).
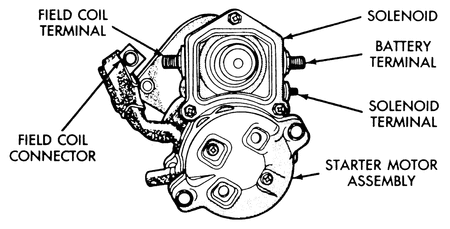
The pinion is driven through a short gear train from the starter armature. But the starter pinion is carried on a shaft that is advanced into the ring-gear by the action of the inline solenoid. The action of the advancing solenoid also makes the internal connection powering the motor. Hence it is 'pre-engaged', meaning that it wont turn until it has been successfully engaged.
The twist in 'classic' installations is that you have a choice of moving the 'hot' battery cable from your existing solenoid to this solenoid, together with the starter activation lead. Or jumping the battery and solenoid terminals on the starter and just hooking up the existing lead from the solenoid, so it acts like an old skool starter I recognise. This had been installed using the latter, I like to think 'more traditional' approach.
So diagnosis consisted of of jumping the body of the starter and its battery terminal. What do you know - nothing happened! But jumping the field coil certainly made it jump. Problem was evidently in the depth of the solenoid field coil.
The starter had no labels on it. But a bit of Googling (vt) of the one number on the fabricated mounting plate tracked it down to a Wosp unit based on a Nippon Denso 1kw starter and distributed by MGOC and Moss. Frankly, there are enough things to go wrong already, so I decided to replace it first and worry about repairing this one to put on a shelf later. That Moss had a 30% summer discount helped my decision. I thought about using one of the newer, more powerful planetary gear starters instead. But that would deny me the future opportunity of cannibalising units for repair, and may have put a bit more strain on my 110amp battery lead as well as another £70 load on my wallet.
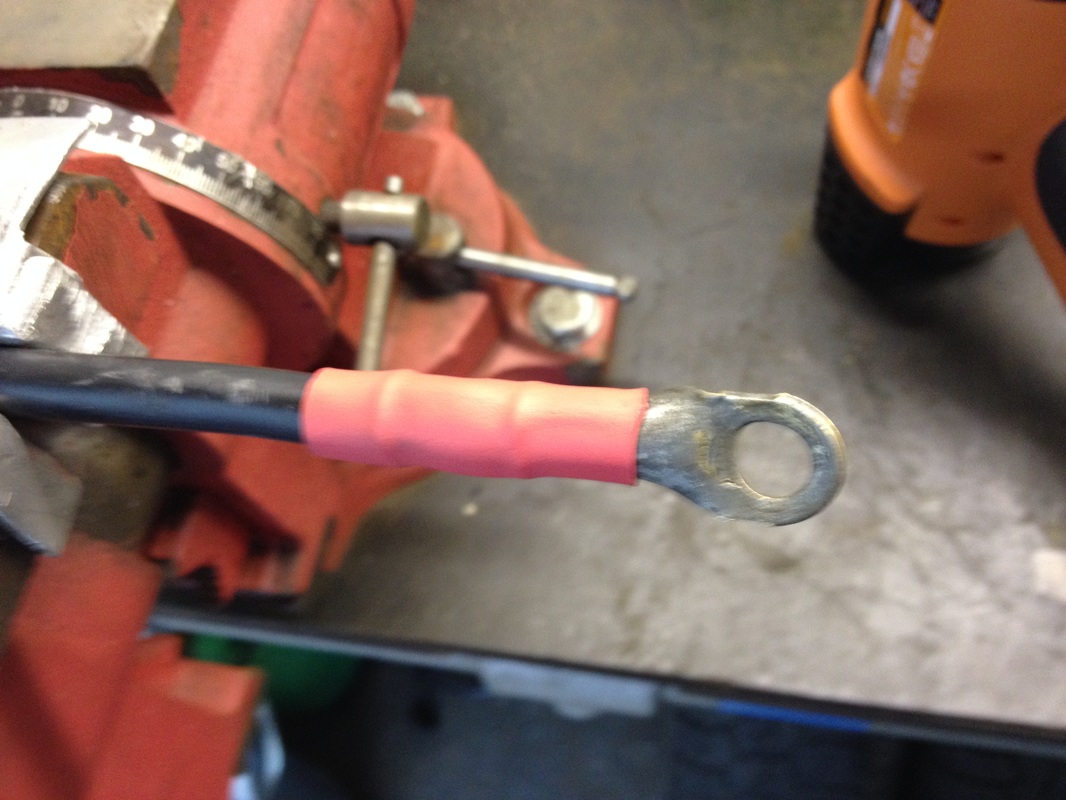
Beginning to prep things before installation, I turned away from replacing the solenoid to starter battery lead. Hell, it had served 50+ years and was only suffering: a bit of what my dentist would describe as 'receding gums' where the old pvc insulation had pulled back from the terminals; and the rubber terminal cover was looking a bit, well, terminal. So wiped it down with pre-prep and finally got to use a new thermostatic heatgun, adding a couple of bits of shrinkwrap tube on each end - a shorter piece over the bare copper, and then a longer sleeve. Why did I not buy one of these new guns before? So much easier and safer than waving around the naked flame of a bic lighter under my dashboard......
The twist in 'classic' installations is that you have a choice of moving the 'hot' battery cable from your existing solenoid to this solenoid, together with the starter activation lead. Or jumping the battery and solenoid terminals on the starter and just hooking up the existing lead from the solenoid, so it acts like an old skool starter I recognise. This had been installed using the latter, I like to think 'more traditional' approach.
So diagnosis consisted of of jumping the body of the starter and its battery terminal. What do you know - nothing happened! But jumping the field coil certainly made it jump. Problem was evidently in the depth of the solenoid field coil.
The starter had no labels on it. But a bit of Googling (vt) of the one number on the fabricated mounting plate tracked it down to a Wosp unit based on a Nippon Denso 1kw starter and distributed by MGOC and Moss. Frankly, there are enough things to go wrong already, so I decided to replace it first and worry about repairing this one to put on a shelf later. That Moss had a 30% summer discount helped my decision. I thought about using one of the newer, more powerful planetary gear starters instead. But that would deny me the future opportunity of cannibalising units for repair, and may have put a bit more strain on my 110amp battery lead as well as another £70 load on my wallet.
Beginning to prep things before installation, I turned away from replacing the solenoid to starter battery lead. Hell, it had served 50+ years and was only suffering: a bit of what my dentist would describe as 'receding gums' where the old pvc insulation had pulled back from the terminals; and the rubber terminal cover was looking a bit, well, terminal. So wiped it down with pre-prep and finally got to use a new thermostatic heatgun, adding a couple of bits of shrinkwrap tube on each end - a shorter piece over the bare copper, and then a longer sleeve. Why did I not buy one of these new guns before? So much easier and safer than waving around the naked flame of a bic lighter under my dashboard......
 |  |
Remember I said the bottom mounting bolt came off surprisingly easily? There was a reason.
When I tried to bolt everything back together, the top bolt was fine but that bottom bolt would not tighten. These are 3/8" UNC bolts that pass throught the steel backplate and screw into the (alloy) gearbox casing. Everywhere you look there are warnings about using the correctly-threaded bolts of a particular length for this mounting beause of the hazard of stripping its blind hole. At this point I am panicking, thinking the next step is dropping the box to manage a sav-a-thread repair. In the midst of this, someone to whom I shall be eternally grateful suggested checking the depth of the blind hole. Bingo - I found another 1/2" of thread length.
Now, this bolt comes preinstalled in the starter because the orientation of the adaptor plate and the Nippon Denso starter means it has to be put in place during factory assembly. So how come it worked at all on the identical, older unit I had pulled the week earlier? Putting them on the bench together or the first time revealed all. There was a trace of viking heritage in the substitution of a bolt that was 1/4" longer than the required MG size, together with the washer having been thrown away.
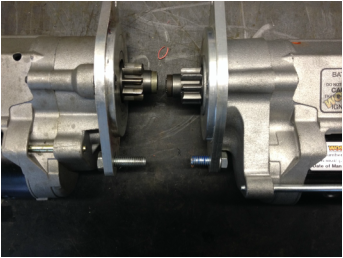 old one, with the longer bolt and no spreader washer is on the left | So I pulled the adaptor plate on the new unit and added a bolt 1/2" longer than the original, together with an imperial washer. Loctite on both the upper and lower bolts and it went back together, good and tight. Then cables attached, dizzie reinstalled, plugs out, and a bit of cranking to produce immediate oil pressure. A bit of prodding on the weber and a slightly faltering start after six months unrun. But soon ticking-over happily. Only residual thoughts are that I have a job in hand first time the box comes out. And that those plugs were screaming 'rich' when I pulled them. Oh, and that I have a Nippon Denso solenoid to fix. |
 RSS Feed